Film photography is making a very welcome comeback. The Lomography movement has had a big effect and the fact that 35mm film can still be  easily bought and processed on the high street with many shops mixing digital printing services with film, notably the Snappy Snaps chain, means film photography is easy and not expensive. In shops a film costs about £5 to buy and £5+ to develop (and the shots scanned and supplied as digital files and printed if you want), but online prices can make this cheaper.
I have been looking back at sets of slides I took on my travels in the 1980s and 1990s and it is astonishing how rare a bad shot is. The vast majority are properly exposed, perfectly focussed and the subjects are well framed and posed. Compare that to working through your mobile phone shots. The vast majority are quickly deleted. Why? I knew how much each picture cost, in money and time. So, I thought hard about every one.
For outdoor photography, the only settings you make are (a) exposure, (b) focus and (c) framing. You can be clever with focus (notably varying the depth of field – how much of the picture is in focus) and exposure (choosing which part of the picture you want to be the ‘correct’ light level). These require more thought and sometimes specific facilities on the camera. However, far and away the most important feature of a good photograph is the last one. Finding an interesting subject and framing and organising the shot.
All film cameras have the facilities to do all of these, from the cheapest simplest device to the most sophisticated. The principle issues that you need to consider are:
A. The range of choice available for different settings.
- Some cameras have fixed focus, so they will only be in focus at one position, normally close to infinity. Almost all cameras offer some choice. Simpler cameras have zone focussing (e.g. the Olympus Trip 35 has four focus points shown with cute icons in the viewfinder). The vast majority have a freely moving focus ring from close to distant. How close they will focus is an issue, if you regularly take pictures with subjects less than a metre away, look for a macro mode or a wider angle lens.
- ASA, which is a feature of the film, so you can set the cameras to match your film. (ASA determines the amount of light needed to correctly expose the film. A higher number means less light is needed and therefore you can get good shots in lower light situations. The most common 200 ASA film is good for most situations and almost all cameras will have this setting. Cameras from the 1960s and earlier may not have a 400 ASA setting, for example.
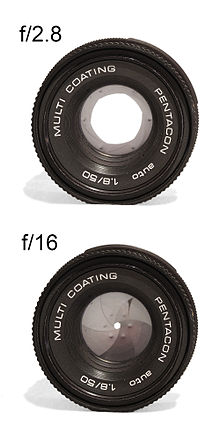
- Aperture is how much of the lens is open to the film. There are blades inside the lens which open and close to shade more or less of the lens. A very tiny hole left in the middle will be the minimum aperture and the blades entirely out of the way make the maximum.
 Very wide apertures make for expensive lenses (fast lenses) and so the maximum aperture is the one most often quoted. A standard SLR lens will have a maximum of f1.8 or f2. The expensive version will be f1.4 and f1.2 or f1.0 lenses are seriously expensive and rare. Smaller compact cameras will normally have smaller maximums (referred to as slower lenses) of f2.8 or f3.5. Also, generally the fastest lenses tend to be those with the standard field of view, which is when the lens shows roughly the width of view that you see with your eyes. Roughly 50mm lenses are the standard.
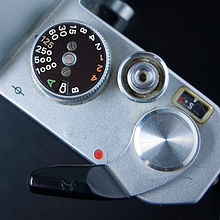
 - Shutter speed. How fast the shutter opens and closes allows you control over taking pictures of moving subjects. Only a few compact cameras give you this control, but most SLRs and more sophisticated smaller cameras do. The range is normally a fraction of a second, with the most common range being between 1/1000 of a second up to one second. Taking a picture leaving the shutter open for more than one second is not needed except in very low light situations. It is hard to hold a camera still by hand for more than 1/60 of a second.
- The combination of ASA (which is fixed by the film) and aperture and shutter speed settings determine the light setting. A handheld light meter will tell a range of different shutter speed/aperture setting combinations you could use to correctly expose the film. One of the major development points for cameras from the 1950s onwards was to build the light meter into the camera.
B. How much do you want to be done automatically?
- Exposure. The Topcon RE Super was the first SLR camera to have a light meter built into the camera that took its light setting through the lens (TTL). In fact Pentax has shown the Spotmatic at shows before the RE Super, but came later to full production. This was a major change. Now, users could look in the viewfinder and vary the aperture setting on the lens and the speed setting on the camera and an indicator whould say whether they need more or less light or if it is correct. This configuration is the classic ‘manual’ camera. The Pentax K1000 is recommended for many photography courses because it works this way (and does nothing else). There are many much better and much cheaper cameras that do so as well (e.g. the beautiful Olympus OM1 or Pentax MX). So, the next developments were firstly, the camera was able to set the shutter speed after you had set the aperture. (An AP or aperture priority system). The Pentax ES was an early example. Next, the camera could set the aperture after you had chosen the shutter speed. (An SP or shutter priority system). The Konica Auto Reflex T (and T2, etc.) worked this way. Finally, the camera could choose suitable shutter speed and aperture combinations for the light available. These were called program systems and initially one sensible program was included and later many different ones (e.g. for portraits, or landscapes etc). Different cameras would have manual only (like the Olympus OM1), AP only (like the Olympus OM10 and Pentax MG), Manual and AP (Olympus OM2, Pentax ME Super, Canon AE-1), Manual, AP and Program (Olympus OM2 SP, Canon AE-1 Program, Minolta X-700) etc. etc.
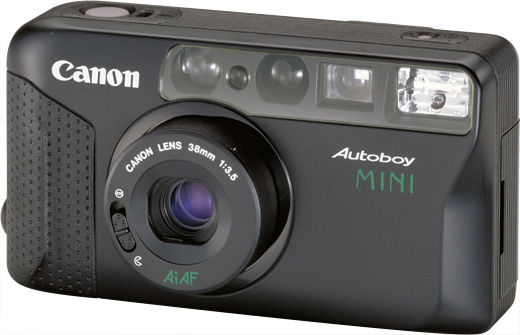
- Focus. The holy grail of automation was a reliable auto focus system. The first commercial example was the Konica C35AF which chose from four different focus points for you. By the late 1980s and 1990s, there was a revolution in compact cameras and increasingly sophisticated autofocus cameras became the norm. Fabulous super sophisticated auto everything cameras from this era sell for ridiculously low prices and take amazing shots. (E.g. the Pentax Espio series, Canon Sure Shot series or Olympus Mju series – apart from the Mju II non zoom which amusingly sells for absurd prices). If you just want to frame and take and get perfect pictures in a camera which I sell for £10-£15 then it is the right choice. They are not fashionable and don’t have that retro look, which is why many people are not interested. Also, they are too automated and you have no control over the key light and focus settings. In SLRs, early auto focus cameras were slow and cumbersome and needed special lenses (e.g. the Pentax ME-F and Canon T80). Only when Minolta introduced the Dynax 7000 did the modern autofocus revolution begin. These cameras look virtually the ssame as the standard modern DSLR. Again, autofocus SLRs are not at all fashionable and sell for absurdly low prices (e.g. Nikon F50 or Canon EOS 1000 cameras with a lens would be £20-£30. You still get full manual, AP, SP, various program modes and can even focus manually if you want). But, they are generally made of plastic and look like a modern camera.
- ASA automation happened very late when Kodak started putting silver and black panels on their film cartridges and these were read by contacts inside the camera. This is called DX coding and all new films have it, but most older cameras cannot read it. But setting the ASA was never very hard.


OK. That sets out the parameters for your choice. Next I will be looking at different types of film cameras to narrow down your search.